It sounded so simple and brilliant. Add a hydrant to my irrigation line so I could add water as needed without worrying about costs. My irrigation metered line from the city allows me 3000 gallons free every month for a flat fee of $12.00. My pond is only 1500 gallons so I could empty and fill it twice a month if desired.
So off to the home depot. First trip purchase hydrant and 3/4 plumbing fittings to tap into the irrigation line. I looked at the irrigation in-line valve before going so I could determine which side to tap into. So I begin digging out the hole, which in my yard is 8 inches dirt, then rock. The piping was burried about 12 inches deep so I had some fun using the 40lb digger bar. Once I uncovered the line, I realized it was 1 inch pvc.
So back to HD for a 1″ to 3/4 Tee and a couple more elbows. Also purchased a ratcheting pipe cutter to make the job easier. Back at home I make the first cut into the 1″ pipe. I had shut off the water but there was still some pressure in the lines so it filled the hole quickly. After bailing out the water I went to make the second cut so my Tee would fit. CRACK goes the pipe. Seems they used a very thin grade of PVC rather than schedule 40 pvc. After further analysis I realize I have to cut it back to an elbow to get good pipe.
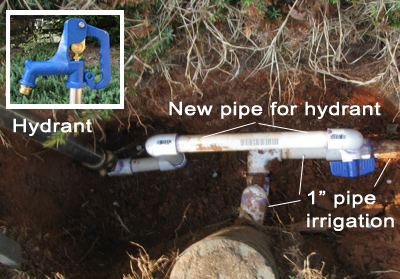
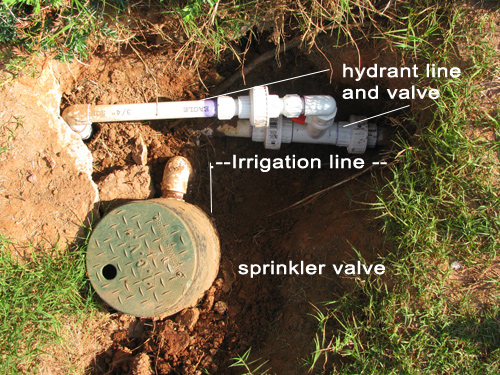
Back to HD to get a new 1″ pipe and elbow. They only sell pipe in 10′ lengths so I have plenty for future needs. Then back home to glue it all together. By now I am fairly adept at measuring and cutting pipe and gluing fittings so this only takes a couple more hours. Of course there was more digging and redesign of the piping to put the hydrant to the side of the valve. I did put in a shut off valve to the hydrant in case we get sever weather one winter, or if my hydrant begins leaking.
I tested the water connections under pressure and all is well. I cemented the hydrant in the ground so it will be stable and put a valve box around the shut off valve to keep it accessible. Total costs for today’s project – $80+ (can’t go to HD with out getting other stuff too.)
 Here is a top down view of the piping and a side shot of the hydrant. The new piping sits above the old irrigation piping but then curves below the irrigation line to the hydrant. The hydrant is buried about 4 inches deeper than the irrigation line.
UPDATE: at the bottom of the hydrant is a weep hole which allows the water to escape from the standing pipe. When you close the hydrant the water drains out. In my case back up through the mud and around the cement. If you are putting one in, add a drain line out of your hole. Less mess to deal with.
UPDATES: See these posts to see the nightmare this project became.
flood-in-the-yard
hydrant-plumbing-nightmares/
hydrant-attempt-4-success
The final solution which seems to be holding as of June 2011. 

